S
tockP
ylonT
rainer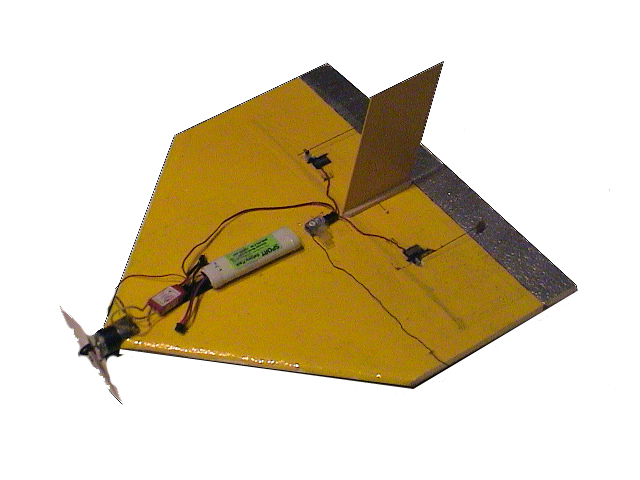
| S tockP ylonT rainer |
|
|
| plan in MSWord |
A few weeks ago, Don Wemple suggested a new type of pylon racing. He envisioned a stock class where all the planes were identical in construction. The piloting skill would be the only variable.
Many would be pylon racers are intimidated by the cost, speed and level of skill needed to participate on a competitive level.
With Don’s parameters, I assembled a cheap, easy to build, easy to see and easy to fly racer.
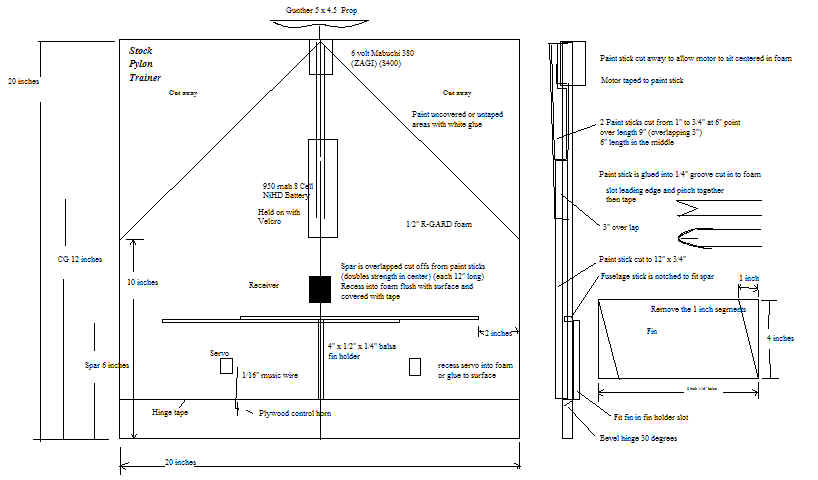
˝" R-GARD foam was used due to low cost, strength to weight and availability( Home Depot). The strength comes from the vapor barrier that is laminated to both sides.
The Delta platform was used for it’s stability and ease of construction.
Paint sticks are used because, hey, they’re free!
The first step is to cut out the 20" x 20" piece of foam. Cut the delta shape using the measurements in the plans. Now cut the elevons free and bevel the leading edge. Cut a channel in the leading edge and tape it closed after pinching it together. You do not want a sharp leading edge as it will cause the plane to "hunt" for angle of attack. Now cut the paint sticks to size and use the cut off for the spar. Cut a channel in the top of the foam and insert the 12" cut offs, overlapping in the center. This gives the added strength needed in the center. Glue in place with foam safe glue. Cover with tape if the glue does not require air. (epoxy and polyurethane don’t need air) Turn the foam over and channel the slot for the "fuselage" stick. Channel down half way into the foam. You will need to notch it for the spar. The motor mount is built from paint sticks wider at the motor end, tapering down to the fuselage stick. They over lap 3 inches. Fill in the space between the motor sticks with another paint stick. Tape hinge the elevons.
Insert the plywood control horns and glue. Attach the servos with glue or recess them and tape over to secure them. Glue down the fin holder. You will need to poke some holes in the plastic film to allow the glue to penetrate to the foam. Cut the fin shape and glue to the holders or pin in place if you want it to be removable. Any foam that is not covered by tape or vapor barrier should be coated with white glue to toughen it and protect if from paint solvents.
Paint to your liking. Mount the battery velcro. Tape the motor in place and install the radio. YOU ARE DONE!
There are some simple rules to keep the stock concept of the event.
Must use a 6 volt ZAGI motor. You may time and break in.
Must use a Gunther press on prop.
Must use a 8 cell 950 mah NiHD KAN cell pack velcroed, no farings.
Fin is not to change size or shape.
Speed control, servos and radio are of your choice.
Downthrust and side thrust is allowed but not needed.
Wire leads maybe taped down but not recessed.
Servos may be glued down or recessed. No farings